We’ve got three hassle-free floor ideas that stand up to daily wear and tear, and easily wipe clean.
Better yet, each project costs less than $400.
1. A Painted Subfloor
If you can’t afford new hardwood floors, paint your subfloor. That’s what Carrie of "Lovely Etc." did after she gave her nasty, old living room carpet the boot.
Prep supply list:
- Dusk mask
- Work gloves
- Pliers
- Flat-bladed screwdriver
- Floor patching kit
- A palm sander or a large floor sander (the latter works faster)
Here’s how she prepped the floor:
- Vacuumed the carpet to cut down on dust.
- Ripped out the carpet and carpet padding.
- Removed tack strips and staples from the subfloor with pliers and screwdriver.
- Patched seams and staple holes with flexible floor patches.
- Sanded the floor (by the way, plywood will never be silky smooth).
- Vacuumed again before painting.
Painting supply list:
- Oil-based floor primer
- Porch and floor paint (Carrie used three colors, one for each of the following: base coat, border, and stencil.)
- Painter’s tape
- Stencil
- Sealer
How she painted the floor:
- Primed the floor.
- Applied the base color.
- Created a border using painter's tape and then painted.
- Used a stencil to paint a design inside the border.
- Used sealer to protect the floor.
Note: She gave each coat of paint one day to dry.
Cost: about $300
What makes it low maintenance? The stencil pattern hides dust and dirt; the sealer prevents dirt from sticking, so it’s easy to wipe clean.
What to consider before painting a subfloor:
- Will it turn off potential buyers?
- In some states you’re not allowed to sell a home if the subfloors are exposed.
Related: How to Paint Concrete Right
2. A Low-Maintenance Bathroom Floor
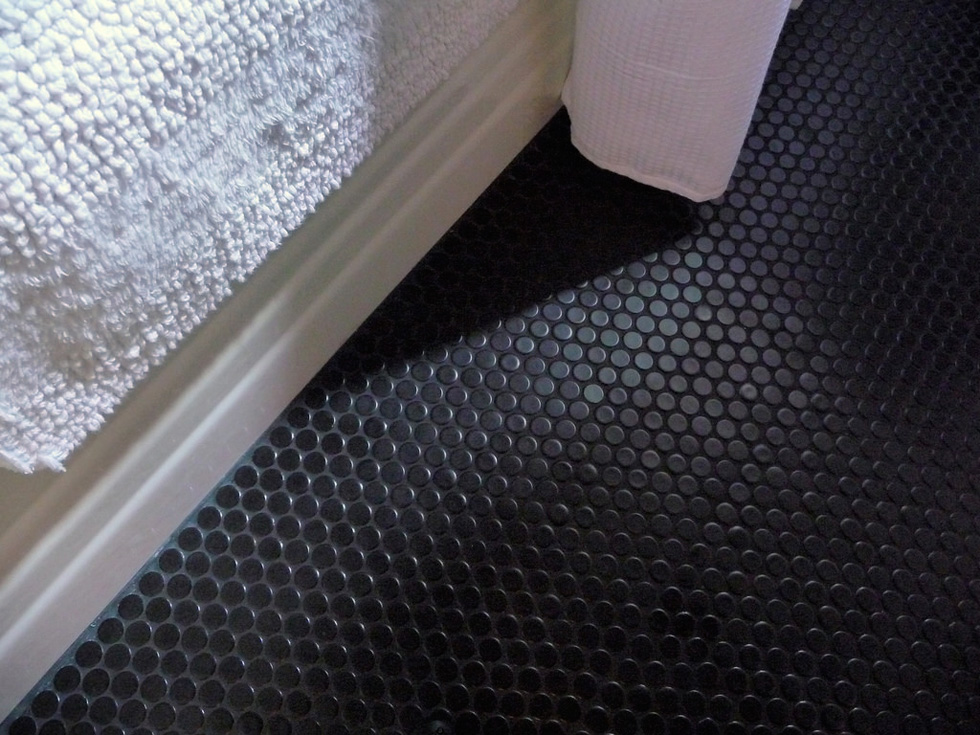
Anna, the blogger behind "Door Sixteen," has a bathroom floor that always looks spotless.
Her secret: The floor is made up of tiny black matte tiles, so dust and water spots never show up. The rest of the space is white, so the room appears cheerful and bright.

Here’s what she used to create the floor:
- Penny-rounds tile in matte black from Nemo
- Sanded grout in charcoal by Polyblend
- Sanded caulk in black by Tec
Anna didn’t detail her install process, but here are some general guidelines for applying mesh-backed penny-round tile.
- Apply a mortar adhesive to the surface with a trowel. The trowel creates ridges to which the tile adheres.
- Lay the mortar in small areas at a time so it doesn’t dry out.
- Adjust the tile sheets to get them just right.
- Cut edges and corners with nippers or circular saw with a tile-cutting blade. Wear goggles!
- Let it dry, and then add grout between the tiles.
- Use caulk where tiles meet at a corner or a tub, toilet, etc.
- Seal the floor after letting everything dry.
Cost: about $350, including a few additional things, like tile underlayment
What makes it low maintenance? When Anna does clean the floor, she vacuums and then wipes it down with a wet Swiffer cloth. She also scrubs the floor’s nooks and crannies every couple of months.
3. A High-Octane Epoxy Floor
The average garage floor is a filthy concrete slab covered with muck, like paint splatters and oil stains.
That’s why Ashley, of the "Shanty 2 Chic" blog, transformed the floor in her garage into a grease- and grime-resistant surface worthy of a muscle-car shop.
She covered the floor with two boxes' worth of Rust-Oleum garage floor epoxy shield. Each of the two available colors, gray gloss and tan gloss, comes with cool confetti chips that give flooring a retro appearance.
Cost: about $150, not including tools
How she painted the floor:
Ashley has a great tutorial on how to epoxy a garage floor. FYI, you can do it yourself!
What makes it low maintenance? Epoxy floors easily wipe clean and resist staining. Now the garage has a dual purpose: It functions as a workshop for her and a playroom for the kids.
Related: 9 Great Garage Storage Ideas
